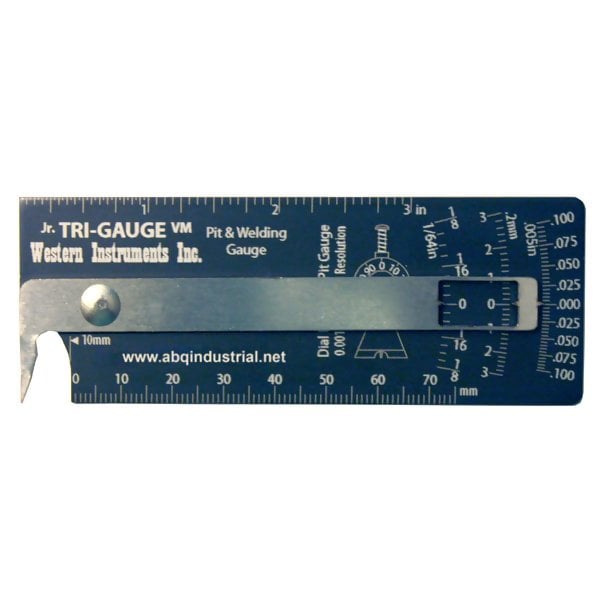
Mechanical Lever Pit Gauge
The N88L-2 Junior Tri-Gauge VM Lever Type Pit Gauge is today's most accurate Lever Pit Gauge, with a continuing tradition of Metric and Imperial Scales. The Junior Tri-Gauge serves its traditional use as a Pit Depth Gauge, but also as a Weld Inspection Gauge for: Weld Undercut Depth, Weld Crown Height, and both Metric and Imperial Rules. The Junior Tri-Gauge, like the original Tri-Gauge, is fitted with our Contact Point Offset Correction for improved accuracy and repeatability. Any Lever Pit Gauge is intended to evaluate corrosion / erosion, and not an absolute measuring tool. The Junior Tri-Gauge is supplied with a Vinyl Sheath Storage Case and Instructions.

Measuring Corrosion (Depth)

While the Junior Tri-Gauge looks similar to the original Tri-Gauge, the method of taking a measurement is different. In the case of the Junior Tri-Gauge, the operator first places the Pivoting Lever Arm in its uppermost position with the Contact Point immediately above the area to be measured. Grasping the Junior Tri-Gauge as illustrated below, the operator presses firmly on the upper edge of the Scale Plate, above the Contact Point, and using his thumb or any of his free fingers, pulls upward on the rear portion of the lever arm. This action will move on Contact Point onto the surface and into the pitted area.
The technique outlined above is necessary due to the long fulcrum ratio between the Contact Point, through the Pivot Point, and to the end of the Lever Arm, so if the Contact Point is pressed into the area being measured, the overbalanced fulcrum will cause a high measurement. If the operator uses the Junior Tri-Gauge like the original Tri-Gauge there will be an error due to spring-back in the Pivot Point and Lever Arm Assembly.
- 1. Pivoting Point
- 2. Scale Plate
- 3. Contact Point
- 4. Pivot Lever

Offset Correction

The Contact Point of the Junior Tri-Gauge is specially formed to bring it in-line with the Contact Surface of the Scale Plate. This Offset Correction ensures error is reduced if the Tri-Gauge is not normal (at right angles) to the surface of the workpiece.

Measuring Weld Reinforcement (Height)

Again, the operator places the Pivoting Lever Arm in its uppermost position. The operator positions the Contact Point immediately above the weld reinforcement, and using his thumb, pulls upwards on the Pivoting Lever Arm which moves the contact point downward. This action will move the Contact Point onto the Weld Reinforcement.

Measuring Weld Undecut (Depth)

Measuring Weld Undercut is identical to measuring Pit Depth. Holding the Junior Tri-Gauge with the Pivoting Lever Arm in its upper most position, the operator positions the Contact Point immediately above the Undercut. Again, using the thumb, the operator pulls upwards on the Pivoting Lever Arm and moves the contact point downward into the area of undercut to be measured. The operator must press the Pivot Point and Lever Arm Assembly into the target area. If the contact point is pressed into the target, by pressing the Scale plate against the workpiece, the Lever Arm Assembly may spring-back and cause an error in the measurement.

Zero Offset

It is important for the operator to regularly check the zero of his Junior Tri-Gauge by placing it on a flat piece of material and engaging the Contact Point with the surface. When this is done, the Scales should read zero. However if there is a positive or negative offset, the operator must note that the error must be compensated for.

Zeroing the Contact Point

When the Junior Tri-Gauge is assembled a skilled technician, using appropriate tools and fixtures, ensures the scales are fully tested to ensure there linearity over the entire measuring range. During normal operation, the Contact Point can become worn or damaged, thus hindering the accuracy of the Junior Tri-Gauge.
If a Junior Tri-Gauge is found to have an inaccuracy, it can be tested by Western Instruments or an authorized calibration depot. However, with the right tools and a thickness standard, one can check and re-standardize the Junior Tri-Gauge. The tools required are a small ball peen hammer, a fine file, and a Thickness Standard. The Thickness Standard, preferably Cold Rolled Steel, must be less than the full deflection of the Junior Tri-Gauges range of 3mm or 0.100.
After you determine if the Contact Point is too short or too long, the contact point is easily adjusted. If the Junior Tri-Gauges Contact Point is long (low measurements), simply file the lower angled edge closest to the Scale Plate. After each draw of the file, the accuracy of the Gauge should be checked on both the high and low end of the scales. If the Junior Tri-Gauge is measuring high (short Contact Point), the bottom portion of the Contact Point should be placed flat on an anvil, that is the Gauge resting on its side. Give a light flat tap, with the broad face of your Ball Peen Hammer, to the end of the Contact Point. Again, after each tap, the accuracy of the Gauge should be checked on both the high and low end of the scales. While re-standardizing a Junior Tri-Gauge in this manner, patience and thought go a long way.

Reading the Scale

With the high contrast between the black background and the white scales, Western Instruments Tri-Series of Gauges (Tri-Gauge XM and Jr. Tri-Gauge VM) provide the inspector with extremely clear measurements. The days of holding a Lever Type Gauge to the correct angle with light are gone. The Operator simply lines up the appropriate Pointer with the desired Scale; fractions of an inch (1/64), millimeters (0.2mm), or thousands of an inch (0.005). The scale is typically dictated by the reference Specification the Inspector is employing, Corporate Guidelines, or the Jurisdiction that normally governs the selection of the scales to use. To gain resolution divisions on all scales of the Jr. Tri-Gauge are fine. Conversely these scales are linear, so estimating half measures in practice is acceptable.
 Downloads
